Monday, 14 December 2009

Some on the road pics.....

Me in the car park outside our house, on the bug after having driven 5 miles from it's garage. Boy was it cold! Battery meter showed capacity at 85%, which sounds way too good, but these are pretty new T-105s so hopefully this is a good sign for future longer drives.

This is a nice side view shot. You can see the new wheels. I've used trailer style wheels to comply with the MOT requirements... I don't think they look as good as the cool buggy wheels you can get in the states, but these are at least affordable and tyres are cheap.

A front view...


The rear section. I've made up a boot/trunk area with a hinged lid to cover over the bag tray. At the moment, I keep the onboard charger in here, together with some on the road spares in case anything goes wrong - always a good idea. I built the rear light clusters from various off the shelf kits. The number plate is lit by two LED bolts, and the charging socket is on the back. The bench seat has two seatbelts for carrying four people - although this slows it down a fair bit...


Final side on view...

Friday, 11 December 2009

Major good news....

Ok, so, sent in the vehicle for MOT this week, and it passed. Then took down the V55/5 form to the DVLA along with the MOT certificate, some ID, and insurance certificate and guess what?

A letter arrived this morning allocating a registration plate! Ok, so it's a Q-plate (meaning they couldn't determine age accurately), but that really doesn't matter.... in short the bug is on the road!

Will post more pics and on the road shots when I get the chance to drive it!

Thursday, 12 November 2009

Pics 4


Here's the batteries on the right hand side. I've used T-105's a 6v, and have 6. I'm hoping to go up to 48V by adding two more in the rear tray. I've used heavy gauge cables that I can make up myself quite nicely now, all soldered and sealed. The fuse box on the left is for the rear light feed that's run from the dash and then under the cart to hear. The cables then run through the gap behind the seats into the rear area.


Here's the cross bar between the seats showing the handbrake and 48V solenoid. At the moment, this runs fine on 36V, and is rated at 600A continous so is beefy enough for the 48V conversion I'm planning later. There's the stock F-R switch, cleaned up. Below this is a modified accelerator board I made to power the Curtis 1206 speed controller at the rear. I just pulled out the standard pins and fixed in a 0-5k pot with a rack and gearwheel. Works beautifully and give very precise control at low speeds. The wiring running along the corssbar goes to the speed controller and the handbrake warning light switch. I've taken out the reverse buzzer and am using the feed for to power a reversing lamp at the rear instead (all off the 12V electric system).


Here's the motor. I've removed the flywheel and brake as I want to replace this with a more powerful unit in future, and have instead put on rear drums with a dual hydraulic/cable unit. There are photos of this later. This has to be done to satisfy the UK road legal requirement that you must have mechanically seperate brake and handbrake systems, and both must be progressive. There is also plug braking from the controller, but this doesn't satisfy the road legal requirement. Anyway, on this cart, I now have 3 seperate braking systems on one axle. Just part of the gymnastics you need to go through to get through an MOT test.....


Here's the curtis controller mounted where the resistors used to be. If you've got this cart, I reckon removing these is the best upgrade you can do, period. You get bags better range. Also, on the other 212 i did first, it's used around a farm and they have big issues with the resistors setting fire to long grass in summer as you drive though. Crazy...
The charging socket on the right is only temporary. There are also two seat post locks on each side with springs attached. These are to lock the seats in place whilst driving, again another road legal requirement here. You can also see the lap belt posts I've put in here. These are M12 bolts anchored to the main chassis for strength. In the rear tray, there's the rear light cluster wiring for the brake/fog/reverse/tail lights. This will be completed next.
Posted by Picasa

Pics 3


Here's that handbrake again.


The rear of the dash. This is the side you spray paint. Make sure to remove all the instruments first though...


The front of the dash.. There's a 48V battery meter on the left, warning lights at the top, a speedo in the center (i run this front the front left wheel, it has a magnet collar that I'll show in a separate photo). On the right you've got a hazard warning light switch, a headlamp/sidelight switch, and rear fog switch.


Here's the dash roughly in place, although not screwed in...
Posted by Picasa

More buggy pics


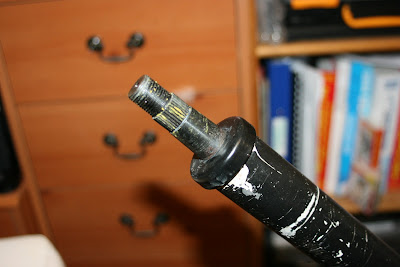
This is the old steering wheel. It's cracked and needs replacing. Its got 36 splines and looks standard but I really need some idea of what to replace it with - nopt sure if early Ezgo stuff fits. Any ideas gladly appreciated...


Here's the column again. Doesn't *look* like the old Ezgo stuff but maybe a wheel would fit?


Seats with lap belts


Rear bench seat
Posted by Picasa

Buggy pics Nov 2009


Posted by Picasa

Wednesday, 5 August 2009

Ok, so that's the intro over. Here's what you are going to need to know if you want to get a buggy road legal in the UK. Bear in mind that this info is to the best of my current knowledge and if you have any extra experience, please let me know or post a comment. There is very likely to be stuff I've not covered here.

Firstly, is your buggy/cart over 10 years old? If so, you have a much much much easier job to do. If not, then you are going to need to put in loads of extras and get it through an MSVA test. Here's the rough roadmap you need in either case:-

If over 10 years old:-
- You need to get it through an MOT according to the regs that applied the year of manufacture. To do this, you'll need a receipt showing when it was bought as proof, and a copy of "The Road Vehicles (Cosntruction and Use) Regulations 1986" as a guide. This is about as easy to read as Dostoyevsky, so here are the basics that apply to golf carts: firstly, you'll need some kind of independant handbrake mechanism that works on either to front or rear wheels. Secondly, you'll need to sort out basic lights and possibly seatbelts (I'm still researching this). Finally, you'll need road legal tyres.
- Assuming you get throught the MOT, you can then take the certificate down to the DVLA together with a V55/5 form, and get a VIN (Vehicle Identifiation Number) number issued.
- You then can go and get a Q plate
- You can then get taxed and insured and you're on your way

If under 10 years old:-
- You'll need to get hold of the MSVA regulations test handbook. It's very well laid out and v easy to read. Ask me if you want to borrow a copy. Then you'll need to go through every item exhaustively and make sure your buggy complies. This is going to mean a *lot* of work depending on the model of your buggy. Loosely, these are the main big problems to overcome: firstly you need brakes on both front and back wheels, plus an independent handbrake system. There are ways of doing this that I've researched, but none look easy or cheap. Secondly, you need a full complement of lights that conform to the SVA regs - not simple but not impossible either. Thirdly, you'll need to sort 3 point seatbelts and this can be problematic on some models, although there are solutions. Finally, you'll need all the basic instruments such as horns, speedos etc. that a modern car should have.
- Once you've done all this right, book a MSVA test at a DVLA testing centre (there are quite a few scattered around the UK), take the buggy there on a trailer. Hopefully you'll pass!
- You are then issued with a VIN, which you can use to get a reg plate, tax, insurance and then on the road!

So that's the roadmap sorted.... now to plan the work......